The
Vernier caliper least counts formula can be calculated by dividing the smallest
readings of the main scale by the total number of divisions of the Vernier
scale. The least Count of the Vernier caliper is the difference between the
smallest readings of the main scale and the smallest readings of the Vernier
scale that is (0.1 mm 0r 0.01 cm).
Vernier
caliper is the equipment used to measure the length, radius, diameter, etc. It
can measure up to (1/10 of mm or 0.1 mm 0.01 cm) which is called at least
count of V.C. It can be used by the lathe mechanic for making metallic
cylinders of different sizes.
There are two scales of Vernier Caliper
·
Vernier scale
·
Main scale
The
main scale can be developed in centimeters period the Vernier scale slides
along the main scale and is developed in divisions less than the millimeters.
Parts and functions of Vernier caliper

There
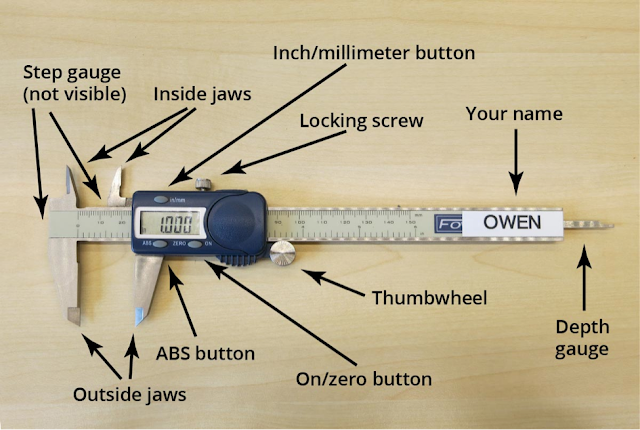
are two sets of jaws:
Two
jaws
1. Lower
Jaws
2. Upper
Jaws
1. Lower Jaws:
The
lower jaws can be used for measurements of length. The thickness or external
diameter of any object.
2.
Upper
Jaws:
The
upper jaws can be used to measure the internal diameter of any object
like a hollow cylinder or tube.
The
jaw's main scale is fixed and the main scale jaws are movable. These movable jaws
are fastened to the Vernier and they slide along the main scale.
Least count
The smallest reading that can be accurately measured with a Vernier caliper is called its least count (L.C), it is also known as the Vernier constant. It is the difference between one main scale division which is 1 mm and one Vernier division which is (0.9).

L.C = 1 mm – 0.9 mm =0.1 mm
There
is another method to find the least count which is given as:
Least
count of Vernier caliper formula
Vernier caliper zero error
When
the jaws of Vernier calipers are moved into contact, the zero of the Vernier
must coincide with the zero of the main scale. Otherwise, the equipment has an
error called zero error. Zero error can be negative or positive.
Negative Zero Error
If
the zero of the Vernier scale is to the left of the zero of the main scale then
the error is called a negative error. The zero error correction will be positive.
Positive zero error
If
the zero of the Vernier scale is to the right of the zero of the main scale
then the error is called a positive error. The zero correction will be negative.
How to read a Vernier caliper?
We
can learn about the use of V.C. with the help of an example by measuring the
area of the cross-section of a solid cylinder by measuring its diameter with a
V.C. We will solve this example step by step.
·
Find the least
count. Close the jaws to check the Zero error and calculate the zero
correction.
·
Hold the cylinder
between the two jaws of the Vernier caliper. Tighten the jaws slowly.
·
Note the main
scale divisions that are either coinciding or is on the left of the Vernier
scale zero.
·
Record this value
as the main scale readings (M).
·
Note the Vernier
division (n) that completely coincides with any one division of the main scale.
Multiply
this “n” with the least count and calculate the value of fraction (x) which is
to be added to the main scale reading.
X = (n × LC)
·
Add the values ‘M
‘and ‘X ‘to the observed value (Y) of diameter.
Y = (M + X)
·
Apply zero
correction to obtain the correct diameter. (D)
D = (Y ± Z C)
·
Take at least two
readings to insert the cylinder cross-section-wise between the jaws and get the
average diameter.
·
Calculate the
radius of the cylinder
Observations and Data

Cautions
about the use of V caliper
·
Jaws of V C should
be closed slowly
·
Zero error
correction should be applied
·
Both jaws should
touch the cylinder
Uses of Vernier caliper
·
It can be used to
find diameter internally and also externally.
·
Lathe Mechanics,
Plumbers, and aluminum and steel window makers also used it.
